In this blog @Mohit Sintre (https://in.linkedin.com/in/mohit-sintre-2816aa16b) a project intern writes up his first steps on how to setup a Jetson Nano and get going with the first steps to have it connected to run a functioning OS on the hardware.
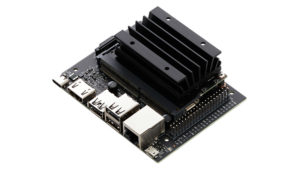
A quick look at the Nano Development Kit can be seen below :

1.microSD card slot for main storage 5.USB 3.0 ports[x4]
2.40-pin expansion header 6.HDMI output port
3.micro-USB port for 5V power input 7.Displayport connector
4.Gigabit Ethernet port 8.DC barrel jack for 5V power input
9.MIPI CSI-2 camera connectors
Setup
MicroSD Card
The Jetson Nano Developer Kit needs a microSD card as a boot device and for main storage. The minimum recommended capacity for Jetson Nano is 32 GB
Micro-USB Power Supply
To power the developer kit the power supply should deliver 5V-2A at the developer kit’s micro USB port. Often if you don’t have a reliable power supply you would run into regular reboots of the OS while connecting the whole setup. A good sanity check for the power adaptor using a multimeter is recommended .

Write Image to the microSD Card
To prepare your microSD Card, you’ll need a computer with internet connection and to read and write SD cards
1.Download the Jetson Nano Developer Kit SD Card Image
2.Write the image to your microSD card by following the instructions below to your computer operating system for Windows

- Download, install, and launch SD Memory Card Formatter for Windows.
- Select card drive
- Select “Quick format”
- Leave “Volume label” blank
- Click “Format” to start formatting, and “Yes” on the warning dialog
Use Etcher to write the Jetson Nano Developer Kit SD card Image to your microSD card
1.Download ,Install and launch Etcher.

2.Click “Select Image” and choose the zip image(unzip the file) file downloaded earlier.
3.Insert your microSD.
Click (cancel) if Windows prompts you with a dialog like this.

4.Click “select Drive” and choose the correct device.

5.Click “Flash” the Etcher will take some time to write and validate the image if the microSD card is connected via USB3.
6.After Etcher finishes, windows may let you know it doesn’t know how to read the SD card .Just click cancel and remove the microSD card.

After your microSD card is ready,proceed to set up the developer kit.
Stepup and First Boot
To interact with the developer kit we need Monitor,Keyboard and Mouse.
Monitor,Keyboard and Mouse – Required
Power– DC power suppy with 5V-2A
Initial Setup with Display Attached
Steps:
*Insert the microSD card to Developer Kit.
*Connect to monitor with HDMI cable.
*Connect the USB mouse and keyboard.
*Connect Micro-USB power supply(5V-2A) the developer kit will start and boot automatically.
First Boot
The green light is turned ON next to the micro-USB connector.Whwn you boot for first time,the developer kit will take you through some initial setup.
*Accept NVIDIA Jetson software EULA.
*Select system language.
*Create username,password and name of the computer.
*App partition size- Select the max size given.

Now you will see the screen and setup is completed this should let the OS run seamlessly . In the upcoming series we would also share information on levarging GPUs and how to get setup and running on these platforms.
For further questions as always write to us at info@tenettech.com


