Snickerdoodle provides support for the commercial operating system such as Ubuntu Linux. The official SD card images for the snickerdoodle is available on the KRTKL’s website and the OS Image has to be configured on the SD card in order to boot into the development environment.
Downloading OS Image
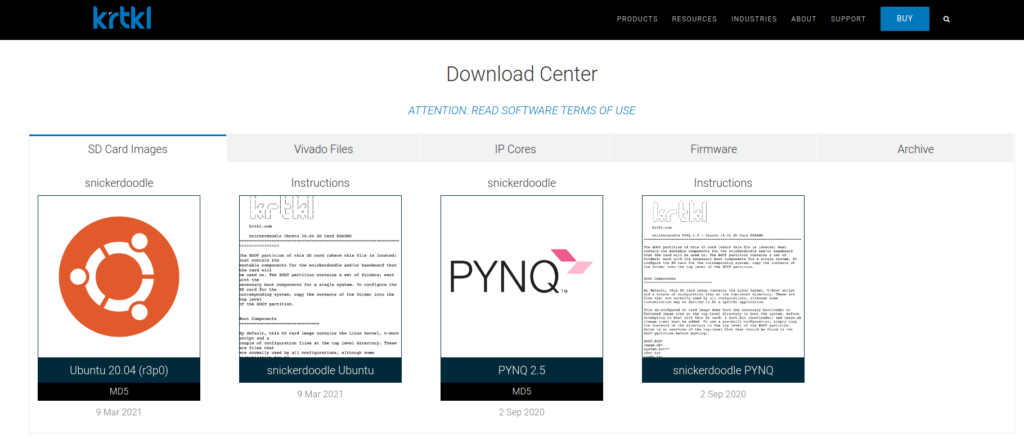
Here, we have downloaded “Ubuntu 20.04 (r3p0)” SD card image from the official KRTKL website.
Download Link:
https://krtkl.com/resources/downloads/
Step 1: Unzipping the downloaded SD Card image
Command:
unzip ~/Downloads/snickerdoodle-sdcard-r3p0.zip
Example Image:

Configuring the SD Card for Snickerdoodle One
Step 2: Before partitioning the SD Card, any partition which is already mounted on the system has to be unmounted
Command:
umount /dev/sdb1
Step 3: Now insert the SD Card and locate the device
Command:
mount
Example Image:

Step 4: Partitioning SD Card for the Linux System
Command:
sudo fdisk /dev/sdb
Note 1: Do not include the partition number when running fdisk on SD card (e.g., “sudo fdisk /dev/sdb1”).
Note 2: In the fdisk interface the following commands are made used.
| Command | Action |
| p | Print partition table |
| d | Delete partition |
| n | Add new partition |
| t | Change partition type |
| w | Write partition to disk and exit |
Example Image:

Step 4.a: Creating partitions
Two Partitions tables namely “BOOT” and “ROOTFS” partitions has to be created in order to configure the SD card image. The “BOOT” partition is a partition that must be allocated for Linux system binaries and files whereas the “ROOTFS” partition is for the Linux root file system.
Note 3:
- “BOOT” partition has to be formatted as FAT32 (type ID ‘C’), and recommended size is minimum of 128 MB
- “ROOTFS” partition has to be formatted as Linux (type ID ‘83’).
Note 4:
A memory sector stores a fixed amount of user accessible data. The sector size of the SD card is fixed and most of the SD card uses 512-byte sector size.
If 512 byte = 1 sector, then 1024 byte = 2 sectors.
If 1 Kilo-Byte = 2 sectors, then 1024 Kilo-Byte = 2048 sectors.
If 1 Mega-Byte = 2048 sectors, then 128 Mega-Byte = 128*2048 = 262144 sectors on 512-byte scale.
Note 5:
Here we can observe that the default sector start value is 2048, so 128 MB has the value of ((128*2048) + 2048) = 264192 sectors on 512-byte scale for the Boot partition and the remaining sectors are chosen for ROOTFS partition.
Example Image:

Step 4.b: Writing partition tables
Example Image:

Step 4.c: Formatting partitions
Command:
sudo umount /dev/sdb1
sudo umount /dev/sdb2
sudo mkfs.vfat -n BOOT /dev/sdb1
sudo mke2fs -b 1024 -t ext4 -L ROOTFS /dev/sdb2
sudo eject /dev/sdb
Example Image:

Step 5: Now re-insert the SD card and locate the mount points for “BOOT” and “ROOTFS” partitions
Command:
mount

Step 6: Getting file system information of the image file
Command:
sudo parted ~/Downloads/snickerdoodle-sdcard-r3p0.img
Note 6: In the parted interface the following commands are made used.
| Command | Action |
| unit | To get information of size |
| B | Size information in bytes |
| To display information | |
| q | Exit from parted |
Example Image:

Step 7: Now creating two directories to mount the SD Card image partitions
Command:
mkdir ~/Downloads/part1
mkdir ~/Downloads/part2
Example Image:

Step 8: Mounting 1st partition of the SD Card image and configuring the “BOOT” partition on the SD Card
Boot Partition Components: These are the file components that needs to be copied before booting the snickerdoodle. The boot partition components include
- boot.bin: It’s the bootloader file, that must be present whenever the device is booted.
- devicetree.dtb: It’s the Linux devicetree file to be loaded by FSBL (First Stage Bootloader), that must be present whenever the device is booted.
- system.bit: This file is optional which contains the bitstream to be built into the boot image.
- uImage: It’s the Linux Kernel Image to be loaded by FSBL.
- uEnv.txt: It contains the configuration options like Ethernet MAC and the specified boot arguments.
- config.txt: This file is used by the Linux initial scripts to configure the user and network settings during boot.
- uboot.scr: It’s the second stage boot loader which is responsible for loading the Linux system components.
Note 7: The “boot.bin” & “devicetree.dtb”, are the must be present file components, inside the boot partition parent directory. (Here we are taking these files for snickerdoodle one board).
Command:
sudo mount -o loop,offset=1048576 ~/Downloads/snickerdoodle-sdcard-r3p0.img ~/Downloads/part1
sudo chmod -R 777 ~/Downloads/part1
cp ~/Downloads/part1/config.txt /media/user_name/BOOT
cp ~/Downloads/part1/README.txt /media/user_name/BOOT
cp ~/Downloads/part1/uboot.scr /media/user_name/BOOT
cp ~/Downloads/part1/uEnv.txt /media/user_name/BOOT
cp ~/Downloads/part1/uImage /media/user_name/BOOT
cd ~/Downloads/part1/snickerdoodle-one/
cp ~/Downloads/part1/boot.bin /media/user_name/BOOT
cp ~/Downloads/part1/devicetree.dtb /media/user_name/BOOT
Example Image:

Step 9: Mounting 2nd partition of the SD Card image and configuring the “ROOTFS” partition on the SD Card
Command:
sudo mount -o loop,offset=134217728 ~/Downloads/snickerdoodle-sdcard-r3p0.img ~/Downloads/part2
sudo chmod -R 777 ~/Downloads/part2
sudo cp -r ~/Downloads/part2/* /media/user_name/ROOTFS
Example Image:

Step 10: Verifying the contents of SD Card and editing the “config.txt” file
sudo chmod -R 777 /media/user_name/BOOT/
sudo chmod -R 777 /media/user_name/ROOTFS/
gedit /media/user_name/BOOT/config.txt
Example Image:


The “Getting Started with KRTKL Snickerdoodle : Part 2” is found here,
Link:
https://blogspot.tenettech.net/2021/07/06/getting-started-with-krtkl-snickerdoodle-part-2/
For details, contact: info@tenettech.com

