The “RF Network on Chip (RFNOC)” FPGA development framework is supported on the 3rd Generation USRP devices and the typical installation process for the “RFNOC 4” includes the following software tools to be installed as prerequisites
- Ubuntu 20.04
- Xilinx Vivado 2019.1 (Design Edition)
- USRP Hardware Driver (UHD – 4.0)
- GNU Radio (GRC – 3.8)
- gr-ettus
Before installing the necessary software tool, update the Ubuntu packages installed on the system.
Command:
sudo apt-get update && sudo apt-get upgrade
Installing the Package Dependencies
Step 1: Installing the necessary package dependencies required for building UHD, GNU Radio & gr-ettus
Command:
sudo apt install git cmake g++ libboost-all-dev libgmp-dev swig python3-numpy python3-mako python3-sphinx python3-lxml doxygen libfftw3-dev libsdl1.2-dev libgsl-dev libqwt-qt5-dev libqt5opengl5-dev python3-pyqt5 liblog4cpp5-dev libzmq3-dev python3-yaml python3-click python3-click-plugins python3-zmq python3-scipy python3-gi python3-gi-cairo gobject-introspection gir1.2-gtk-3.0 build-essential libusb-1.0-0-dev python3-docutils python3-setuptools python3-ruamel.yaml python-is-python3
Example Image:

Step 2: Installing the Package Dependencies for Xilinx Vivado
Command:
sudo apt install libtinfo5 libncurses5
Example Image:

Installing Xilinx Vivado
Step 3: RFNOC development framework looks for “Xilinx Vivado” in its default installation location. So, create a directory in “/opt” for installation.
Command:
sudo mkdir /opt/Xilinx
sudo chmod -R 777 /opt/Xilinx
Example Image:

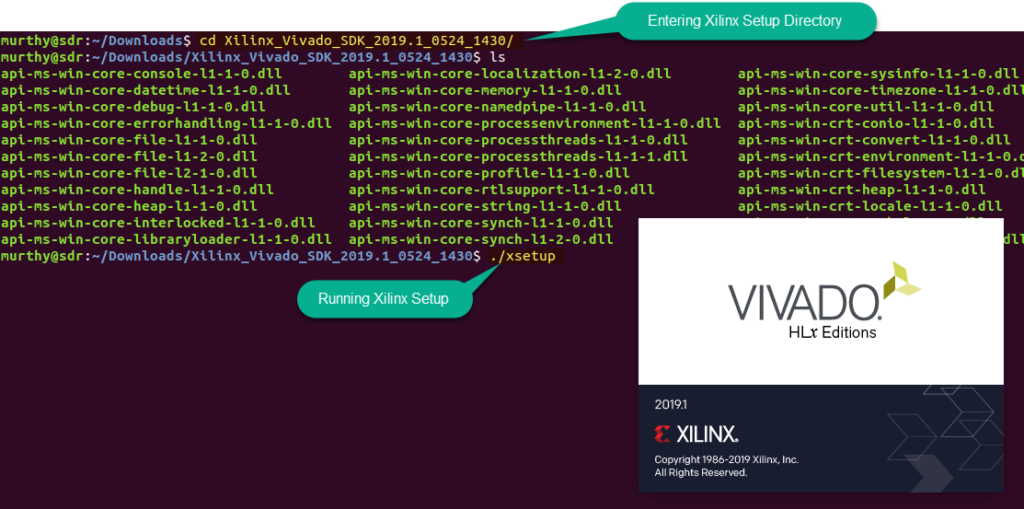
Step 4: Running Xilinx Setup
Command:
cd ~/Downloads/Xilinx_Vivado_SDK_2019.1_0524_1430/
./xsetup
Example Image:

Step 5: Executing the Xilinx Installation.
- From this step on-wards, the GUI interface is supported to run the Xilinx Vivado installation process.
- Point the installation location to “/opt/Xilinx”, and proceed the installation.
Example Image:


Installing USRP Hardware Driver (UHD 4.0)
Step 6: Cloning the USRP Hardware Driver (UHD 4.0 branch) from Ettus Research GitHub repository.
Command:
git clone – -branch UHD-4.0 https://github.com/ettusresearch/uhd.git uhd
Example Image:

Step 7: Creating build directory for executing the build process and running cmake to create the make files required for the build process.
Command:
cd /uhd/host/
mkdir build
cd build
cmake ..
Example Image:

Step 8: Building & Installing the UHD to the default prefix “/usr/local/lib”, and updating the shared library cache.
Command:
make
make test
sudo make install
sudo ldconfig
Example Image:

Installing GNU Radio
Step 9: Cloning the GNU Radio (branch – 3.8) from GNU Radio GitHub repository.
Command:
git clone – -branch maint-3.8 – -recursive https://github.com/gnuradio/gnuradio.git gnuradio
Example Image:

Step 10: Creating build directory for executing the build process and running cmake to create the make files required for build process.
Command:
cd /gnuradio/
mkdir build
cd build
cmake ..
Example Image:

Step 11: Building and Installing the GNU Radio to the default prefix “/usr/local/lib”, and updating the shared library cache.
Command:
make
make test
sudo make install
sudo ldconfig
Example Image:

Installing gr-ettus
Step 12: Cloning the gr-ettus from Ettus Research GitHub repository.
Command:
git clone – -branch maint-3.8-uhd4.0 https://github.com/ettusresearch/gr-ettus.git gr-ettus
Example Image:

Step 13: Creating build directory for executing the build process and running cmake to create the make files required for build process.
Command:
cd /gr-ettus/
mkdir build
cd build
cmake -DENABLE_QT=True ..
Note: “-DENABLE_QT=True” in cmake process will enable the “gr-fosphor” installation for RFNOC.
Example Image:

Step 14: Building and Installing the gr-ettus to the default prefix “/usr/local/lib”, and updating the shared library cache.
Command:
make
make test
sudo make install
export PYTHONPATH=/usr/local/lib/python3/dist-packages/:$PYTHONPATH
sudo ldconfig
Example Image:

Validating the Installations
Step 15: Set the default “Python Path” for UHD, GNU Radio & gr-ettus in the “.bashrc”.
- The location of the “.bashrc” file is “/home/user_name/.bashrc”.
- Open the “.bashrc” file and add the below python path at the end of the file and save.
Python Path:
export PYTHONPATH=/usr/local/lib/python3/dist-packages/:$PYTHONPATH
Example Image:

Step 16: Validating the UHD Installation.
The Installation can be validated without the USRP connected to the system by running the following commands.
Command:
uhd_config_info –version
Command Response:
UHD 4.0.0.0-133-g7ec04886
(or)
Command:
uhd_find_devices
Command Response:
[info] [UHD] Linux; GNU C++ version 9.3.0; Boost_107100; UHD_4.0.0.0-133-g7ec04886
No UHD Devices Found
Example Image:

Step 17: Validating the GNU Radio Installation.
Command:
gnuradio_config_info –version
Command Response:
V3.8.2.0-199-gcba012fb
Example Image:

Step 18: Validating the gr-ettus Installation.
Command:
rfnocmodtool help
Example Image:

For details, contact: info@tenettech.com


