This Document mainly focuses on the installation of Cuda programming platform on the NVIDIA Nano Jetson Development board with the simple step by step process as mentioned below. Let’s first begin with what is Cuda programming platform.
What is Cuda programming?
CUDA is a parallel computing programming model developed by Nvidia for general computing on its own GPUs (graphics processing units). CUDA enables developers to speed up compute-intensive applications by harnessing the power of GPUs for the parallelizable part of the computation. Considering the two terminologies as mentioned below:
- Host memory : The host computer system with CPU and its host memory
- Device memory : The NVIDIA development board with GPU and its device memory
In Cuda programming, we make use of both the host and the device memory. Since we are using two different devices in just a single program. Therefore such types of computation are called as Heterogeneous computation.
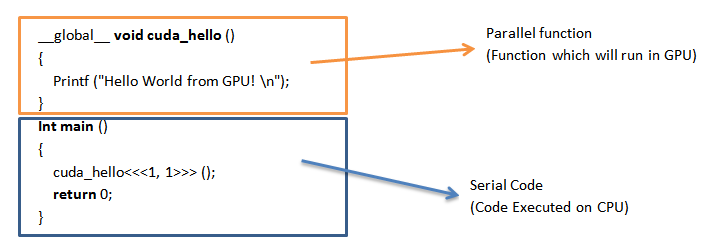
The __global__ specifier indicates a function that runs on device (GPU). Such function can be called through host code, e.g. the main () function in the example, and is also known as “kernels”. When a kernel is called, its execution configuration is provided through <<<…>>> syntax, e.g. cuda_hello<<<1, 1>>> ().
Let’s now check the working model of Cuda programming with multiple steps mentioned below.
Step 1:

Step 2:

Step 3:

Since here we are considering the latest version of cuda programming ,i,e CUDA 10.01 , these are the following specification which are listed below :
- Group of threads which can corporate among themselves are grouped together to create a block called as warp ( In CUDA 10.01 , 1 warp consist of 32 threads i,e 1 warp = 32 threads / block )
- Group of warp together form a block called thread block . ( In CUDA 10.01 , 1 thread block consist of 32 such warp , i,e 1 thread block = 32 warp / block )
- Therefore the number of threads per thread block is = 32×32 = 1024 threads /block
- In CUDA 10.01 ,the number of blocks in one grid = 65,535 , therefore the number of threads per grid = 6,71,07,840 threads / grid .
Since it has a huge combination of threads available for performing the instruction multiple times for parallel computation . Hence the execution of real time signals becomes faster.
Installation of Cuda on NVIDIA Nano Jetson Development board
For installing the Cuda, there is a need for downloading a proper driver based on the architecture of boards. Follow the link the mention below. If you have a development board with the architecture namely as
- X86_64: It is mainly for Intel x 86 boards with 64 bit (also referred as “amd64).
- Ppc64le: It is mainly for IBM Power litter related Architecture.
https://developer.nvidia.com/cuda-downloads
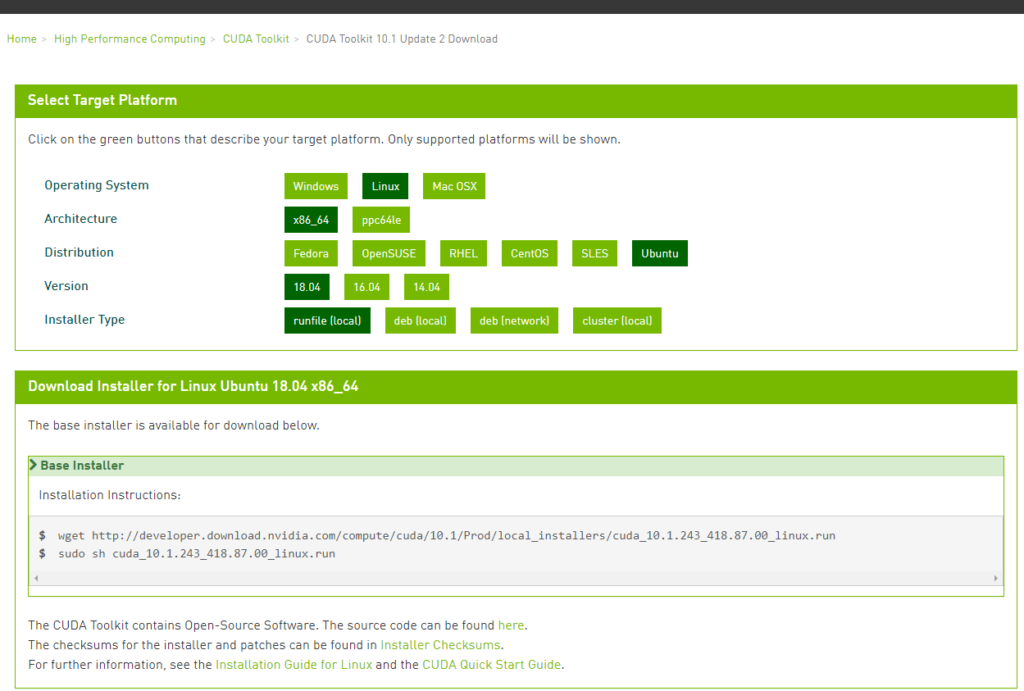
And follow the installation Guide for Linux for further details LINK
To determine which distribution and release number you’re running, type the following at the command line:
$ uname -m && cat /etc/*release
If you have flashed an upgrade image from the previous blog content, then you have an Ubuntu 18.04 image with aarch64 bit architecture on your development board. In such case, the above technique will result in to execution format error.

This is because the execution format doesn’t matches with the format which is already installed in build along with the other dependencies packages. Yes, we don’t need to install any Cuda driver, as it is already included in it. Just need to change the path of Cuda driver 10.01 from its location to bashrc path.
Run the command,
sudo vi .bashrc

And export the path of the Cuda drivers.
export PATH=${PATH}:/usr/local/cuda/bin
export LD_LIBRARY_PATH=${LD_LIBRARY_PATH}:/usr/local/cuda/lib64
And further save the file by typing “ESC” button followed with “: wq”.
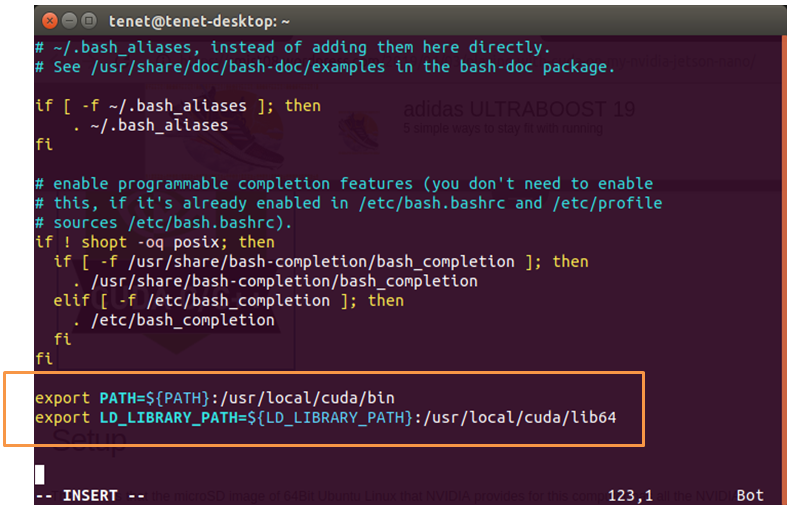
Now verify whether the Cuda driver is properly installed with the commands mentioned below:
$ nvcc –version

Now you are ready with the Cuda programming platform.
For purchase of Nvidia Nano Jetson Development Board :
https://www.tenettech.com/product/nvidia-jetson-nano-developer-kit
Enjoy Exploring!

